The easiest way to track solo ads is to give each provider or campaign its own tracking link, then follow what happens from the initial click through the rest of your funnel.
Use the Free Solo Ad Tracker
If you want a simple way to keep your campaign numbers together, use the Free Solo Ad Tracker.
It helps you record vendors, costs, clicks, leads, sales and ROI in one place so you can compare your solo ad campaigns more easily over time.
→ Use the Free Solo Ad Tracker
At minimum, I would want to know:
- how many visitors arrived
- where they came from
- how many opted in
- what each lead cost
- whether those subscribers opened or clicked later emails
- whether any eventually converted
The provider’s click counter is useful, but it should not be the only number you rely on.
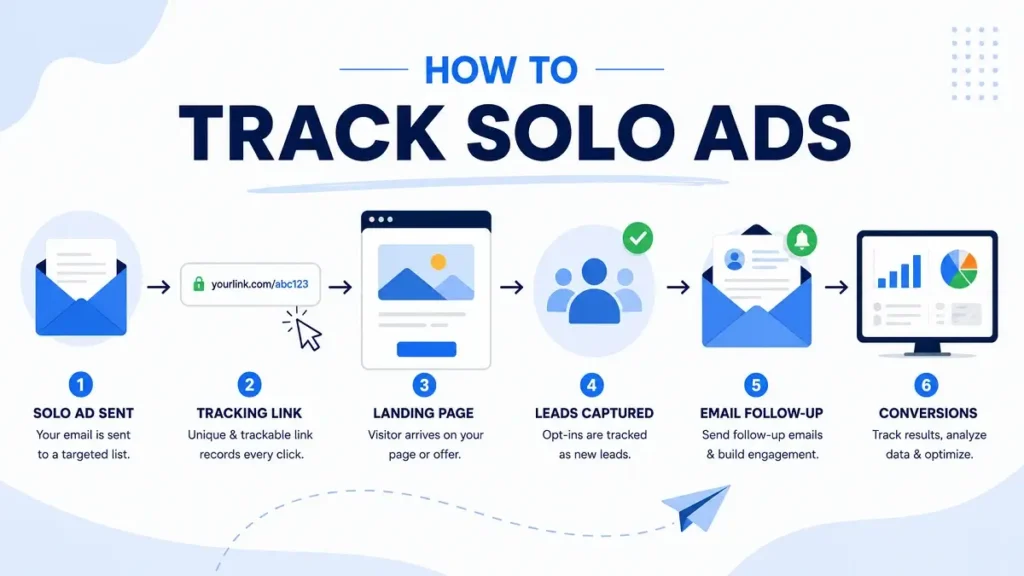
A simple tracking flow
Provider sends traffic
→ Tracking link
→ Landing page
→ Opt-in
→ Email follow-up
→ Clicks and conversions
The further you can follow that visitor, the better you can judge what you actually paid for.
- Use the Free Solo Ad Tracker
- Why Solo Ad Tracking Matters
- Don't Mix Every Provider Into One Link
- A Simple Way to Use UTM Parameters
- Keep Your Naming Consistent
- What Should You Track First?
- Provider Clicks and Your Clicks May Be Different
- Total Clicks vs Unique Clicks
- Track Geography Too
- Track the Opt-In Rate
- Track Cost per Lead
- But Don't Stop Tracking at the Opt-In
- Tag Subscribers by Provider
- Track Follow-Up Clicks
- What About Email Opens?
- Watch Unsubscribes Too
- Track Conversions When You Can
- Track Revenue Separately by Campaign
- Use More Than One Review Point
- Keep a Simple Solo Ad Tracking Spreadsheet
- Record the Campaign Date Too
- Record Which Landing Page You Used
- Don't Change Five Things at Once
- Track Device Type If Something Looks Wrong
- Use a Separate Tracking Link for Every New Test
- Track Over-Delivery Correctly
- Don't Obsess Over Tiny Tracking Differences
- Create a Baseline Before Comparing Too Much
- A Simple Example From Click to Conversion
- What Would I Track for Every Solo Ad Campaign?
- The Goal Is Better Decisions, Not More Data
- How I Would Set Up a New Campaign
Why Solo Ad Tracking Matters

Imagine you buy 300 clicks from two providers.
Both deliver exactly 300 clicks.
If that is the only number you record, the campaigns look identical.
But suppose the results are:
Provider A
300 clicks
60 leads
8 follow-up clickers
1 sale
and:
Provider B
300 clicks
105 leads
31 follow-up clickers
4 sales
The providers delivered the same amount of traffic.
They did not deliver the same value.
Tracking lets you see the difference.
Don’t Mix Every Provider Into One Link
If you are testing multiple sellers, avoid sending all of them to exactly the same untagged URL.
For example:
example.com/free-guide
If Provider A, Provider B and Provider C all send traffic there, your analytics may show total results without making it obvious who produced what.
Instead, separate them.
For example:
Provider A → campaign A tracking link
Provider B → campaign B tracking link
Provider C → campaign C tracking link
Then you can compare each campaign individually.
This is especially useful when following the approach from How to Choose a Solo Ad Provider and testing sellers against each other.
A Simple Way to Use UTM Parameters
One easy option is adding UTM parameters to your landing-page URL.
A URL might look something like:
example.com/free-guide?utm_source=provider-a&utm_medium=solo-ad&utm_campaign=september-test
The important pieces are:
utm_source
Who sent the traffic.
Example:
provider-a
utm_medium
What type of traffic it was.
Example:
solo-ad
utm_campaign
Which specific campaign or test it belongs to.
Example:
september-test
You do not need complicated names.
You just need a system you will understand later.
Keep Your Naming Consistent
This sounds minor until you have twenty campaigns.
Avoid ending up with:
providerA
Provider-A
providera1
pa-test
trafficA
for the same seller.
Pick a format and keep using it.
For example:
utm_source=provider-autm_medium=solo-adutm_campaign=2026-09-test-1
A simple naming system makes reports much easier to read later.
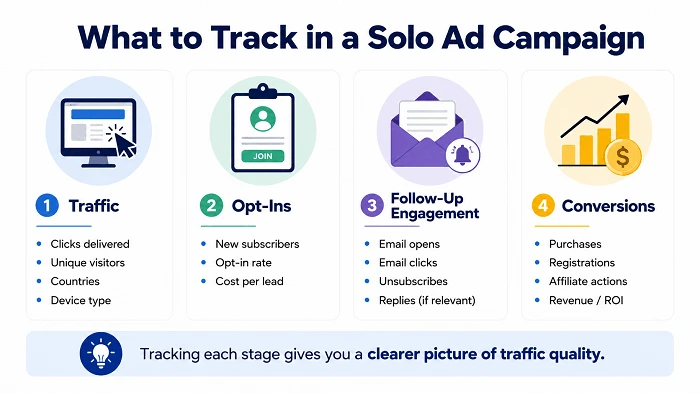
What Should You Track First?

I would divide the campaign into stages.
Stage 1 — Traffic
Track:
- clicks
- unique visitors
- countries
- device type if useful
Stage 2 — Opt-Ins
Track:
- new subscribers
- opt-in rate
- cost per lead
Stage 3 — Follow-Up Engagement
Track:
- email opens
- email clicks
- unsubscribes
- replies if relevant
Stage 4 — Conversions
Track:
- purchases
- registrations
- affiliate actions
- revenue where possible
You may not be able to measure everything perfectly.
But even basic tracking across these four stages gives you much more information than a click count alone.
Provider Clicks and Your Clicks May Be Different
Do not be surprised if the provider reports:
300 clicks
while your analytics shows:
282 visitors
A difference does not automatically mean the seller did something wrong.
Systems can count traffic differently.
Possible reasons include:
- repeated clicks
- unique vs total clicks
- bots filtered by one platform
- page closed before analytics loaded
- ad blockers
- browser privacy settings
- redirects
- different filtering rules
What matters is whether the difference is reasonable and whether you see a pattern.
Total Clicks vs Unique Clicks
This is worth understanding.
One person could click your link three times.
A system counting total clicks may report three.
A system counting unique visitors may report one.
For evaluating a paid traffic campaign, I usually care more about how many actual visitors reached the funnel than how many times the link was clicked.
That is one reason I would ask a provider how they count clicks before ordering.
Track Geography Too
If you ordered US traffic, Tier 1 traffic or another geographic package, your own analytics should give you a rough way to verify that.
For example:
United States: 72%
Canada: 12%
United Kingdom: 9%
Australia: 5%
Other: 2%
Small mismatches are not necessarily a problem.
As discussed in What Is Tier 1 Solo Ad Traffic?, IP-based location is not perfect.
But if the geography is completely different from what you ordered, that is worth investigating.
Track the Opt-In Rate
Once traffic reaches the page, the next obvious number is how many visitors subscribe.
The formula is:
Opt-in rate = Leads ÷ Visitors × 100
Example:
250 visitors
85 subscribers85 ÷ 250 × 100 = 34%
That tells you how efficiently the landing page turned visitors into leads.
As covered in What Is a Good Solo Ad Opt-In Rate?, the percentage is useful — but it should not be judged in isolation.
Track Cost per Lead
This is one of the most useful numbers for comparing campaigns.
CPL = Campaign cost ÷ Leads
Suppose:
Campaign cost: $180
Leads: 90
Then:
$180 ÷ 90 = $2 CPL
Now compare two providers:
Provider A CPL: $3.10
Provider B CPL: $1.95
That tells you much more than simply knowing their advertised click prices.
For a quick calculation, use the CPL Calculator for Solo Ads.
But Don’t Stop Tracking at the Opt-In
This is where a lot of solo ad analysis becomes too shallow.
Suppose Provider A gives you:
100 leads
$1.50 CPL
Provider B gives you:
80 leads
$2 CPL
Provider A appears better.
Then, seven days later:
Provider A: 8 follow-up clickers
Provider B: 27 follow-up clickers
Now the picture changes.
That is why I would tag or segment subscribers by traffic source where possible.
You want to know what Provider A’s leads do later, not just how many entered your list.
Tag Subscribers by Provider
If your email platform supports tags, groups, custom fields or automation rules, use them.
For example:
solo-provider-asolo-provider-bsolo-provider-c
Then later you can answer:
Which provider’s subscribers open?
Which ones click?
Which group unsubscribes more?
Which group buys?
Without source tagging, all those leads eventually get mixed into one list.
Once that happens, comparing providers becomes much harder.
Track Follow-Up Clicks
I personally find follow-up clicks especially useful.
An opt-in requires one action.
A follow-up click requires the subscriber to:
- remain on your list
- receive another email
- open or interact with it
- click again
That gives you another signal about whether the lead has any continuing interest.
For example:
Campaign A
Leads: 100
7-day follow-up clickers: 6
Campaign B
Leads: 75
7-day follow-up clickers: 24
Campaign A produced more leads.
Campaign B may have produced the more useful audience.
What About Email Opens?
Opens can still be useful as a rough signal, but I would not rely on them as heavily as clicks.
Email privacy features and image loading can make open tracking less precise than it used to be.
A click generally tells you more because the subscriber actively interacted with something inside the email.
That does not mean ignore opens completely.
Just put them in context.
Watch Unsubscribes Too
Imagine a provider delivers 100 leads.
Within three days:
28 unsubscribe
That is information.
It does not automatically prove the traffic was poor — your own email content could be part of the problem.
But if one traffic source consistently produces much higher unsubscribe rates than another while everything else stays similar, I would pay attention.
Useful tracking is often about spotting patterns across several campaigns.
Track Conversions When You Can
Ultimately, a lead usually needs to do something valuable.
That might be:
- make a purchase
- register for a service
- click an affiliate link
- request information
- book something
- complete another goal
If possible, connect conversions back to the traffic source.
For example:
Provider A
80 leads
2 conversions
Provider B
65 leads
6 conversions
Provider A generated more leads.
Provider B generated more of the action you actually wanted.
Track Revenue Separately by Campaign
If your setup allows it, record revenue too.
Example:
Campaign cost: $200
Revenue after 7 days: $90
Revenue after 30 days: $260
Once you have your campaign cost and revenue, the Solo Ad ROI Calculator can help you check the return.
Now you can see how the campaign develops over time.
That is much more useful than saying:
“The campaign lost $110 on day one.”
Email traffic can have delayed value.
But as we discussed in Are Solo Ads Worth It?, delayed measurement should not become an excuse to keep pretending bad traffic will eventually improve.
Use More Than One Review Point
I like a simple schedule.
Day 0
Clicks
Visitors
Countries
Opt-ins
CPL
Day 7
Email engagement
Follow-up clicks
Unsubscribes
Early conversions
Day 30
Additional conversions
Total revenue
Longer-term engagement
You could use different time periods.
The exact schedule matters less than giving every campaign the same evaluation process.
Keep a Simple Solo Ad Tracking Spreadsheet
You don’t need sophisticated software to start. A simple solo ad tracking spreadsheet can be enough to keep your campaigns organized and compare results over time.
If you don’t want to build one yourself, the Free Solo Ad Tracker gives you a simple place to record vendors, costs, clicks, leads, sales and ROI.
For example:
| Metric | Provider A | Provider B |
|---|---|---|
| Cost | $150 | $200 |
| Clicks ordered | 250 | 250 |
| Visitors tracked | 238 | 241 |
| Leads | 72 | 96 |
| Opt-in rate | 30.3% | 39.8% |
| CPL | $2.08 | $2.08 |
| 7-day clickers | 13 | 31 |
| Unsubscribes | 7 | 4 |
| 30-day conversions | 2 | 6 |
Now you have something much more useful than:
“Provider B seemed pretty good.”
You have data you can compare later.
Record the Campaign Date Too
Traffic quality can change.
A provider that worked well six months ago may behave differently today.
So save:
- provider name
- campaign date
- order size
- price
- targeting
- landing page
- offer
- results
This prevents you from treating every past campaign as if it happened under identical conditions.
Record Which Landing Page You Used
Suppose Provider A sends traffic to Landing Page 1.
Provider B sends traffic to Landing Page 2.
Provider B converts much better.
Was Provider B’s traffic better?
Maybe.
Or Page 2 was better.
Record the landing page used in each campaign so you know what changed.
This is also why I prefer keeping major variables stable when comparing providers.
Don’t Change Five Things at Once
Imagine Campaign 1 performs poorly.
For Campaign 2 you change:
- provider
- landing page
- headline
- lead magnet
- email sequence
Campaign 2 performs better.
What fixed it?
You do not know.
Whenever practical, change one major variable at a time.
If you are comparing traffic providers, keep the funnel reasonably consistent.
If you are testing the landing page, keep the traffic source reasonably consistent.
Cleaner tests produce more useful decisions.
Track Device Type If Something Looks Wrong
You do not need to obsess over desktop vs mobile in every campaign.
But it can help diagnose problems.
Suppose:
Desktop opt-in rate: 42%
Mobile opt-in rate: 14%
That may tell you something about the page rather than the traffic.
Maybe the form looks broken on phones.
Maybe the button is hidden.
Maybe loading is slow.
Tracking can help you avoid blaming the provider for a funnel problem.
Use a Separate Tracking Link for Every New Test
Even if you use the same provider again, I would create a new campaign identifier.
For example:
provider-a-test-1
provider-a-test-2
provider-a-test-3
Why?
Because you may eventually discover:
Test 1 CPL: $2.10
Test 2 CPL: $2.25
Test 3 CPL: $4.60
If all three campaigns use the same source identifier, those results may get blended together.
Separate tests let you see whether performance is consistent.
Track Over-Delivery Correctly
Suppose you buy 300 clicks and receive 330.
Your order cost was $180.
The advertised CPC was:
$180 ÷ 300 = $0.60
But your effective delivered CPC was:
$180 ÷ 330 = about $0.55
That is useful to know.
Just remember that extra clicks only matter if they are useful clicks.
I would not give a provider a high score simply because they delivered 10% extra traffic.
Don’t Obsess Over Tiny Tracking Differences
Suppose:
Provider reports: 300 clicks
Your tracker: 294
That is a 2% difference.
I probably would not spend much time worrying about it.
Now suppose:
Provider reports: 300
Your tracker: 181
That is something I would investigate.
There is no universal percentage that proves a tracking problem.
Use common sense, understand how each platform counts visitors, and look for large or repeated discrepancies.
Create a Baseline Before Comparing Too Much
Your first few campaigns will teach you what is normal for your funnel.
You may start discovering patterns like:
Landing page usually converts around 30–35%
Follow-up click rate usually lands around 15–20% of leads
Typical CPL is around $2–$3
Now when a new campaign produces:
8% opt-in rate
$9 CPL
almost no later engagement
you have something meaningful to compare it with.
Without a baseline, every number feels either good or bad based mostly on instinct.
A Simple Example From Click to Conversion
Imagine you spend $180.
The campaign produces:
300 provider clicks
286 tracked visitors
100 subscribers
Your opt-in rate based on your tracked visitors is:
100 ÷ 286 × 100 = about 35%
Your CPL is:
$180 ÷ 100 = $1.80
After seven days:
28 subscribers clicked a follow-up email.
After 30 days:
5 conversions
$240 revenue
Now you can describe the campaign properly:
Cost: $180
CPL: $1.80
Follow-up clickers: 28
30-day conversions: 5
Revenue: $240
That is much more useful than:
“I bought 300 clicks.”
What Would I Track for Every Solo Ad Campaign?
At minimum:
Provider
Date
Campaign cost
Clicks ordered
Clicks/visitors tracked
Countries
Opt-ins
Opt-in rate
CPL
7-day follow-up clicks
Unsubscribes
Conversions
Revenue when available
If you consistently record those numbers, your own campaign history eventually becomes more useful than generic benchmarks from somebody else’s funnel.
The Goal Is Better Decisions, Not More Data
You can track hundreds of metrics.
That does not mean you should.
The numbers should help answer practical questions:
Should I buy from this provider again?
Is this landing page working?
Are the leads engaging?
Which provider gives me the best CPL?
Which provider’s leads eventually convert?
Should I increase the order?
If a metric does not help you make a decision, you probably do not need to stare at it every day.
How I Would Set Up a New Campaign
My basic process would be:
1. Create a unique tracking link
Identify the provider and campaign.
2. Send traffic to one stable landing page
Avoid changing everything during the test.
3. Tag the subscriber source
Keep Provider A leads separate from Provider B leads.
4. Record delivery and opt-ins
Calculate your own opt-in rate and CPL.
5. Check engagement later
Look at follow-up clicks, unsubscribes and conversions.
6. Save the results
Build a campaign history you can compare over time.
That gives you enough information to make progressively better traffic decisions without turning tracking into a full-time job.
The next step is putting one of the most important numbers into a simple formula: